Getting started
Welcome to this guide on how to get started with WP Synchro and do your first migration.
We will take you through the steps needed, from scratch to a functioning setup with WP Synchro.
We hope you enjoy using it. Should you experience any errors, consult the other parts of the documentation.
Introduction #
WP Synchro is designed to be a complete migration tool for WordPress developers. It was created due to a lack of good and complete tools in this genre, that is designed for the needs of the professional developer.
A lot of migration plugins already exist, but most of them are more like backup-and-restore tools for entire sites, and they don't support partial migration of data. That is great if you are migrating your entire site to a new domain or hosting.
But not so good when handling incremental changes, such as syncing a staging site with a production site many times. Or only wanting to migrate parts of the database and specific files or directories. They also very often contain quite a few manual tasks for each migration.
This is where WP Synchro comes in, as it is specifically designed to synchronize two sites, handling both the database and the files. It allows you to pinpoint the exact database tables you want migrated and specify the directories and files you want. You create so-called "migrations," which are migration configurations that can be run multiple times, even from the command line via WP-CLI.
You set WP Synchro up once and with the push of a button or cron, run the migration again and
again...
With no manual tasks each time!
Requirements #
WP Synchro does have a few requirements to work properly:
- PHP: 7.0 or newer
- WordPress: 4.9 or newer
- SQL: MySQL 5.5 or newer / MariaDB 5.5 or newer
- Administrator rights to install and access the plugin
- Database user must be able to create and delete tables in the database
- For file migration, permissions for PHP to read/write data on the target site.
We recommend:
Use PHP 7+, to get the best possible speed for migration and on your site in general.
Installation #
To get started with WP Synchro you first need to get it installed on both the sites you want to use it on. So maybe you need to establish a WordPress site as your new staging site or dev site first. Or even get your local development environment up and running with an empty WordPress site that is ready to be migrated to or from.
Installation for WP Synchro PRO
If you have WP Synchro PRO, you can download the newest version from my account. This will give you a .zip file that can be installed as a plugin. To do that you go to your website and log in to the backend in /wp-admin and navigate to the submenu "Add New" under menu "Plugins" . Here you press "Upload Plugin" -button in the top and choose the zip file you just downloaded. This will install WP Synchro PRO.Licensing for PRO version
To make sure your PRO version is ready for action after installation, you need to insert your license key in "WP Synchro" > "Licensing" menu. Also make sure to save it, so it will be validated. Your license key can be found on my account in the "Licensing" menu after logging in to daev.tech.Installation for WP Synchro free
If you want to use the free version, it can be downloaded as a official WordPress plugin. You can find it by navigating to the submenu "Add New" under menu "Plugins," where you can search for "WP Synchro" in the search field and install it from there.Verifying that plugin is working
WP Synchro contains a "Health check" that checks if base requirements are fulfilled and then executes a few tests to make sure everything is working as intended. This can and should be run on both sites where it has been installed. Health check can be found on the "Support" page in WP Synchro menu.
Everything should now be installed, activated and ready on both the installations you are going to use.
Setup #
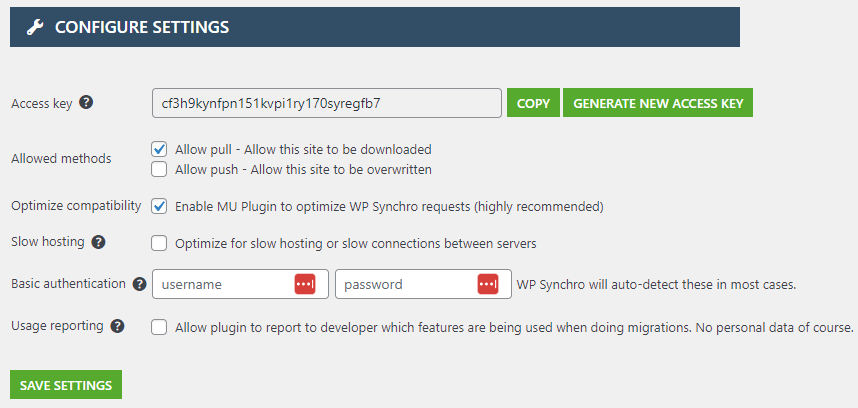
Next step is to make sure the configuration of WP Synchro is correct, so navigate to the menu "WP Synchro" and submenu "Setup". First you need to make sure the access key is created and is a long string like 'lo2l1dx92yhdlg0g219dp5hqy8jywxu7'. If not, you should generate a new access key and save.
In the setup you also choose what is allowed on this installation from a remote installation. If the site you are configuring is a live production website, maybe you would want to only allow 'pull', to prevent the site from being overwritten by mistake.
When this is done, you are ready to set up your first migration job. This can be a database migration, a files migration or both.
First migration #
Before you run a new and shiny migration, we recommend making a backup of the target environments, just in case.
We try to test on as many environments and setups as possible, but this is quite complicated software that is affected by a range of server configurations, which can differ widely among hosting providers. If you do experience problems, let us know, so we can fix it as soon as possible.
When you get the backup created, you should start creating your first migration by going to the "Overview" page.
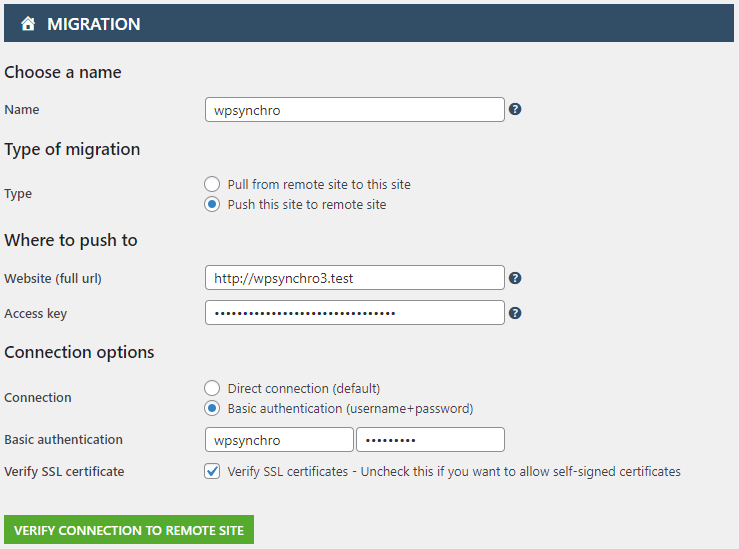
From here you can press the "Add migration" button, which will lead you to the page where you can add your migration, as shown in the picture to the right.
Here you give it a name such as "Pull from production" and choose if you want to pull data to this site or push data from this site to a remote one.
After that, you input the root absolute URL to the site you want to migrate to/from and also the access key that can be found in "Setup" on the remote site.
To verify connection to the remote host and access key, press the button "Verify connection to remote site". If that works, you are ready to start configuring what data you want to migrate.
Here you can either choose to go with one of the pre-configured migrations or create the specific
one you want.
Check out the documentation on database
migration and file
migration to learn more on creating a specific one.
Last, but not least, you would want to save your new migration. Don't worry, you can edit it anytime
afterwards to suit your needs.
Now you are ready to run the new migration. Go to "Overview" page, where
you will find your new
migration configuration.
Run it and watch the magic happen.
Still using free version? - Upgrade to PRO with 14 day free trial
PRO version makes it possible for you to migrate files between your sites and to
automatically make a database backup before migration.
You will get support for Basic Authentication and email notifications on success or failure. You also get access to priority support